Chapter 39 Pruning and Pinching to Develop Fine Branches and Foliage Pads
Pruning leaves and green terminal branches (what I call “green pruning”) can do more than just maintain the overall triangular silhouette of a bonsai, or controlling extension growth. Properly timed and executed, green pruning also can:
- Stimulate terminal ramification (fine twiggy branching of the branch tips) like that shown in Figure 1;
- Encourage back budding (in some species);
- Stimulate growth of some branches but not others;
- Reduce the average leaf size by as much as two thirds.
The biggest challenge for describing green pruning is that many species have very particular guidelines for how it should be done. So for this topic I have provided some general guidelines for green pruning general groups, then described some more specialized types of pruning. If I know of any species- specific guidelines, I included them in the individual species guides. Please, anyone who has more experience with a particular species, pass along what you know; I will update the species guide accordingly.

39.1 Why Call It Green Pruning?
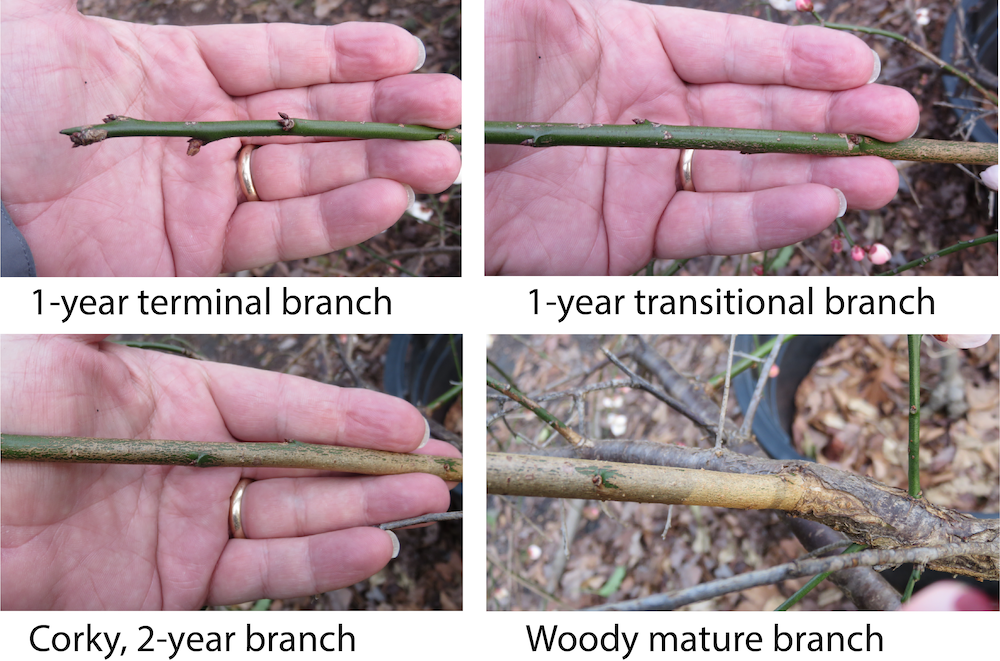
The goal when pruning and wiring older woody branches is to shape the internal scaffold of the tree. Once these bones are in place, they should not need to be pruned or modified much. Green pruning shapes and adjusts the foliage and its supporting terminal branches. This stage of shaping is mainly applied to growth that is no more than a year old (maybe two years on some species.)
When a bud on a terminal branch or a back-bud on older wood breaks, new leaves or needles emerge first. Soon after that a soft green stem forms and the bud begins lengthening. This is called extension growth. Initially the extension growth has very few woody fibers so is very tender.
Within a few weeks of emerging, a new shoot begins to lay down cellulose fibers that are stiffer and lignified. This is the green woody stage of growth. During the growing season the green wood continues to extend, leaving behind older wood that becomes denser. The surface of this green wood has thin, skin-like bark. As it extends the new shoot may form intermediate buds at points called nodes. The woody shoots between the nodes are the internodes.
Near the end of the growing season, the oldest woody parts are fully mature, while the newer parts of branches are still very flexible (semi-ripe). It will take another 1-3 years for the skin-like bark on the shoot to fully lignify and mature into thick, corky bark. The branch tips (and any intermediate nodes) have new buds covered in woody scales that will repeat the cycle the next year.
(Anyone who has read about propagating plants or trees by cuttings probably recognizes the terms green wood, semi-ripe, and 1-year hardwood cuttings before. The stages of growth I just described correspond to the stage of growth desired for particular types of cuttings.)
After the first year or two, green branches begin to grow in circumference more than in length, and to lay down additional layers of woody fibers. At this point, they can be managed using woody branch pruning techniques.
39.2 Basic Green Branch Pruning
Generally green extension growth will be pruned back to 2-4 leaves or buds. Make the cut 1/8-1/4 inch in front of the buds; any growth beyond that will die back as the new lateral buds emerge. Use sharp scissors, and save your concave cutters for heavier jobs.
Green branches can be cut back anytime in the growing season, but tend to respond differently when pruned at certain times.
- Pruning the first flush of new extension growth in early spring tends to stimulate the buds nearest to the pruning cuts to break and extend. Green pruning the first flush several springs in a row creates fine terminal ramification.
- Pruning green extension growth later in spring as overall growth starts to slow down is less likely to cause buds to break. Late spring pruning keeps growth controlled without stimulating as much ramification.
- Random green branches may start extending all summer long. These can be pruned back as they appear. Here in Piedmont NC, stop pruning green growth after mid-September. Pruning later in the fall can stimulate growth that will not have time to harden before the first frost.
1. 
2. 
3. 
4. 
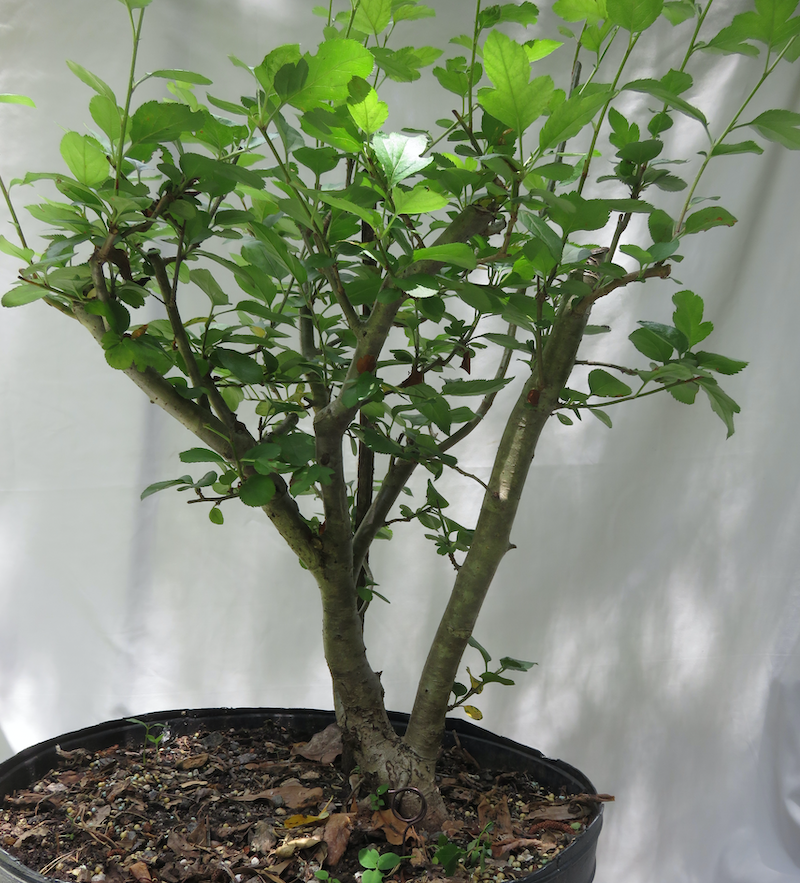
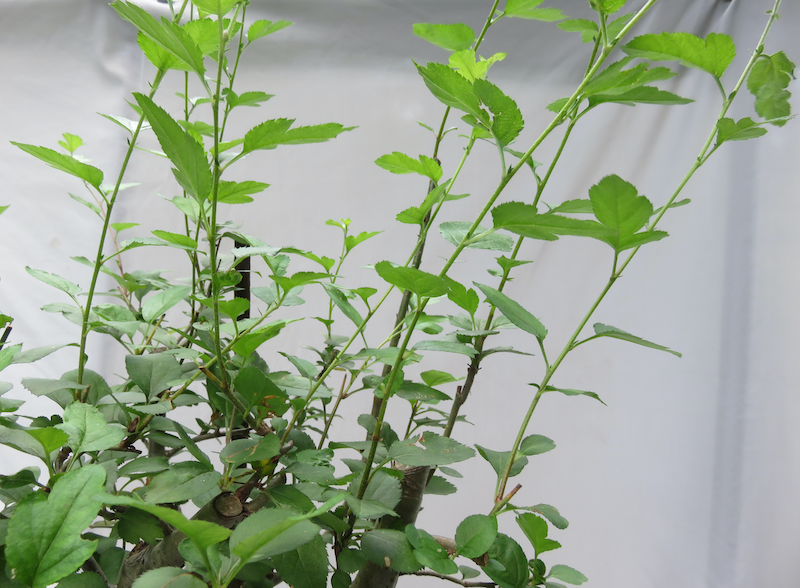
Managing green branches. This photo sequence shows how I have been developing a crabapple. This tree first broke buds in early March; these photos were taken in early June. Image 1. The base of the tree. Image 2. The mass of green extension growth that developed since March. Image 3. The base of a green branch that emerged from a bud last year and formed a single pair of leaves (orange arrow). This spring the green branch extended nearly 18 inches (well beyond the photo) and formed 6 pairs of leaves. I do not want this terminal shoot to get any taller. To keep the foliage more compact, I cut this and the other green extensions back hard, just beyond the first full set of new leaves (blue arrow.) Image 4. The fully pruned tree. Once 1-2 of the smaller side shoots on the right-hand trunk grow larger, I plan to remove the portion of the trunk above the point marked with the wire wrapping. Original photo by Dan Johnson.
39.3 Pinch Pruning
The goal of pinch pruning is to thin out the foliage mass or reduce the number of buds that are present. While it is labor intensive, pinch pruning is the preferred way to manage growth and refine foliage pads on conifers. It also works well on boxwoods and other small-leaved non-conifer evergreens.
Pinch pruning will feel brutal at first, but it does less damage than pruning with scissors. Pinching also provides the stylist with much better control. Finally, it stimulates new growth and thickening of the existing growth.
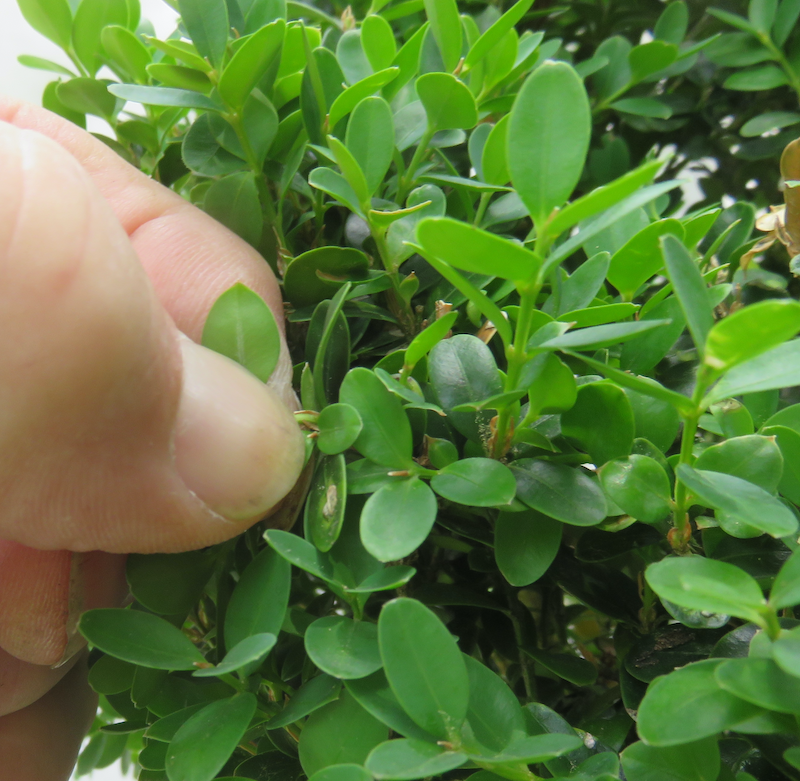
To pinch prune green foliage, grasp part of it between your thumb and forefinger so that the foliage spreads out a bit. Use the other hand to pull off the tips of the green extension growth. Let it go and see if the length is more in line with where the foliage pad should end. If it is short enough, move to the next area to pinch back. If not, simply pinch again. If any woody strings are left behind, snip them off with scissors.
1. 
2. 
3. 
4. 
5. 
6. 
7. 
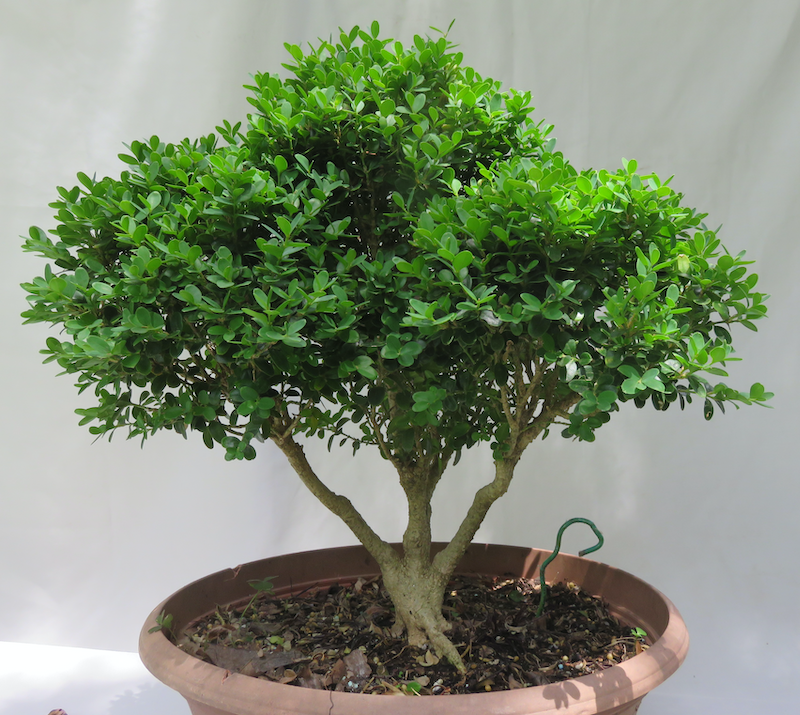
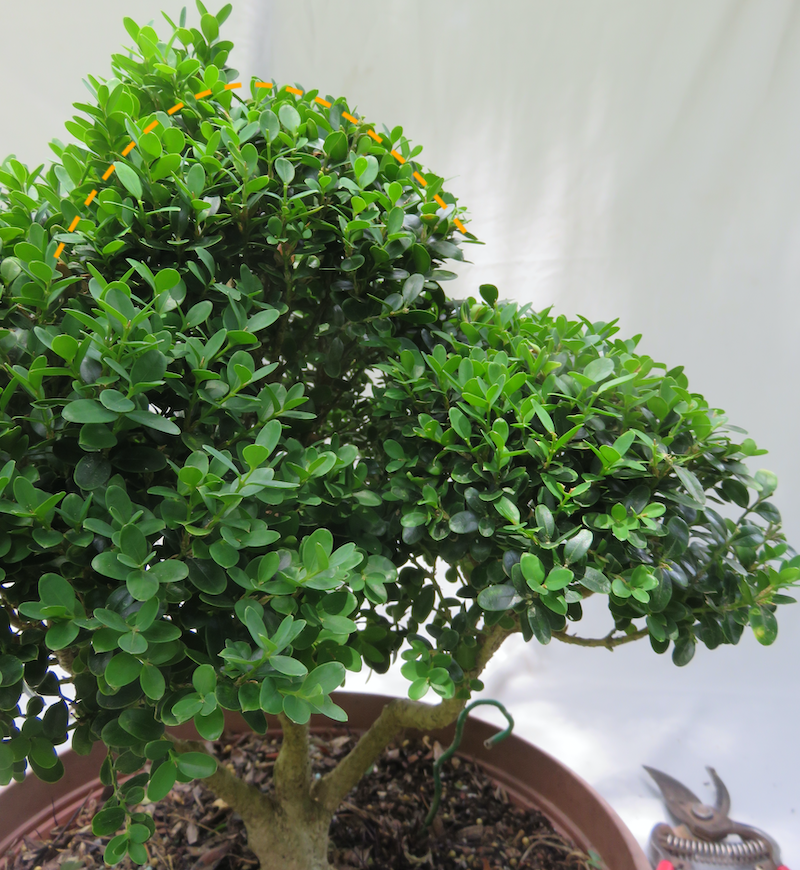
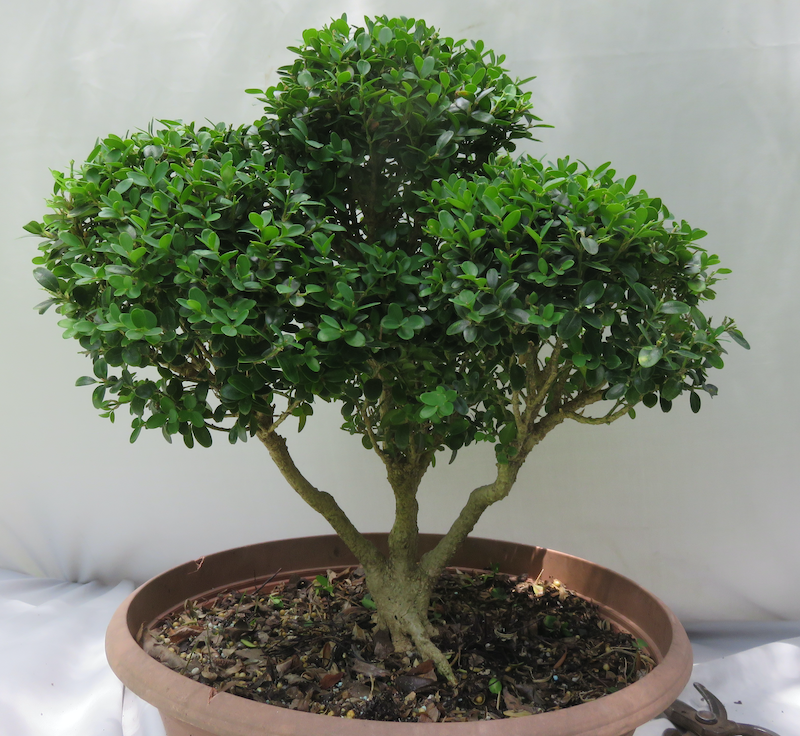
Pinch pruning a boxwood. Image 1. The back of the unpruned boxwood. Image 2. Close-up view of the new spring growth. Image 3. Pinching the growth between my fingers. I find pinch pruning is easier if I have not cut my nails recently. Image 4. Pinch the foliage so that the new ends form a smooth arc. Image 5. The middle mass of foliage has been pinched on the right side, and not yet pinched on the left. This shows how much is being pinched off. Image 6. Back view after pinch pruning. Image 7. Front view after pinch pruning. This boxwood needs 1-2 more years before it will fill in the gaps in the foliage (orange circles). Original photos by Dan Johnson.
39.4 Pruning Pine Candles
Developing good pine bonsai requires some very specific green pruning techniques. When a pine begins growing for the season, 3-7 large buds form at the ends of the branches. These quickly start to lengthen without developing any needles. These extensions are the candles. Each candle has the potential to form a new branch. On young pines the central candle continues growing in the same axis as the supporting branch. The surrounding candles radiate outwards like spokes on a wheel. If you look at pines in open ground that are 5-15 feet tall, you will see spokes of branches at different heights about the ground. Each set represents the extended candles from one year.
The shape of a pine can be modified by reducing or removing candles.
- Breaking off the candle entirely removes that potential branch; breaking off all candles prevents all branches from lengthening.
- Breaking off the top half of a candle off reduces the rate of growth so that the distance between sets of branches is smaller. Shortening the candles by half over the entire pine keeps the entire tree more compact.
Pine pruning
39.5 Leaf Pruning and Defoliation
Leaf pruning forces a tree to grow new, smaller leaves. It also increases ramification. It should only be done on temperate deciduous trees such as maples, elms, hornbeams, etc. Broadleaf tropicals and evergreens do not respond consistently, and defoliation will kill conifers.
Defoliating specific parts of a tree can reduce and redirect growth to specific areas of the tree. For example defoliating the top part of the tree while leaving the bottom part unpruned can re-invigorate the lower half when the lower branches have started to weaken.
This is a very stressful treatment, so should not be done to recently repotted or pruned trees, diseased or weakly growing trees, or trees that are still in early training. It also should not be done every year.
Leaf pruning is done after the first flush of spring growth has expanded and hardened. June usually is the best month for leaf pruning, but it can be pushed into July. Leaf pruning later in summer may not allow enough time for the foliage to harden and new buds to form for the next year.
The process is simple enough: using sharp scissors, the blades (flat portions) of leaves are removed by cutting through the petioles (stems) at the point where the petiole connects to the blade. Most of each pruned petiole remains in place to protect the buds located at the junction of the petiole and the branch.
TIP: Before committing to large-scale leaf pruning, learn how your trees respond with some preliminary test pruning first. Pick the largest leaves on a tree, scattered across the canopy (up to 10% of all leaves), and clip them. Watch what happens as the new leaves emerge; they should be smaller than the leaves you removed. If no new leaves emerge, that particular species may not respond well to leaf pruning. If the new leaves are the same size, then this particular species may not respond by reducing leaf size.
Leaf-pruned trees should be put in a place where they are protected from strong midday sun until new leaves emerge, then slowly re-acclimated to more sun.
1. 
2. 
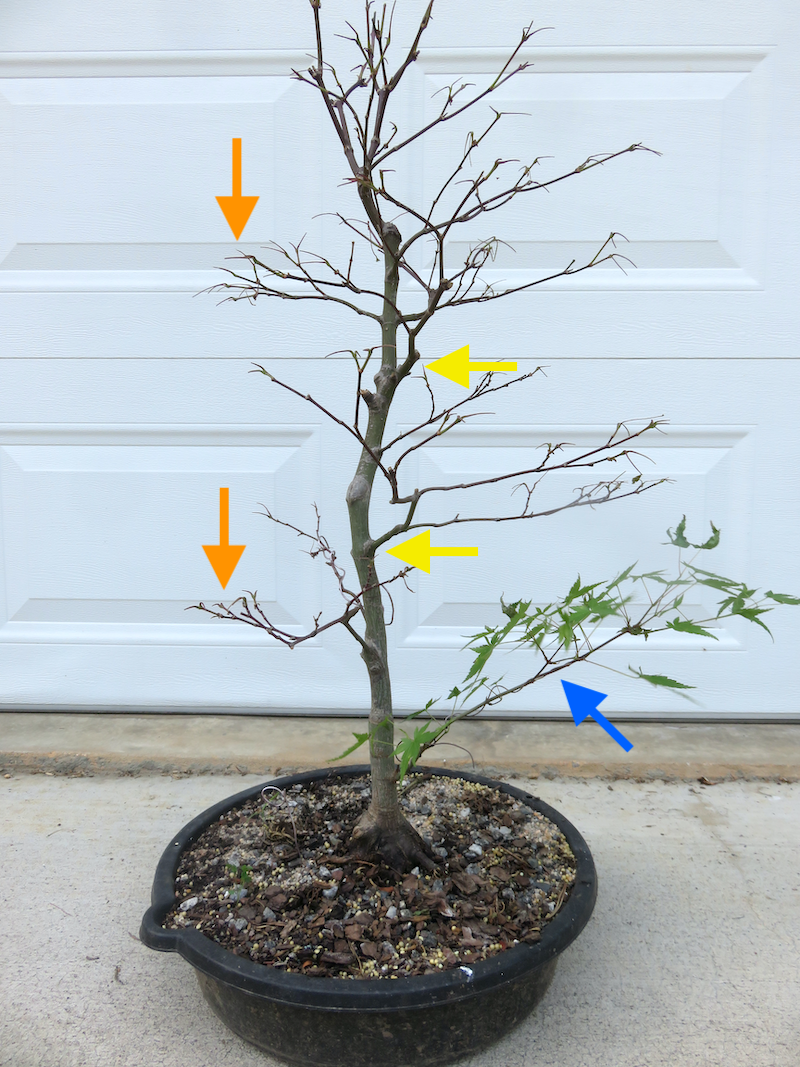
Selective leaf pruning to thicken one branch. Image 1. This Japanese maple has a lower branch (blue arrow) that is thinner than the upper branches (yellow arrows.) All of the leaves on the upper branches has been removed so that the lowest branch will have an opportunity to thicken up more this season than the other branches. The orange arrows indicate the remaining petioles of pruned leaves. Image 2. Close-up view of the petiole remnants. The blade of each leaf was cut off with scissors, leaving just the leaf stems (orange arrows.) The stems remain in place to protect the new foliage buds located at the base of the petioles (blue arrow). Original photos by Dan Johnson.
39.6 How Much Green Pruning Will Trees Tolerate?
It depends on what type of tree you are pruning.
39.6.1 Conifers
Examples of this group include: junipers; true and false cedars; cypresses, bald cypresses, sequoias; pines. Foliage is mainly in the form of scales or needles.
These species cannot move water and nutrients without foliage. A FEW species will back bud on branches that do not have any green foliage but they are the rare exceptions. The general rule is, once all foliage has been removed from a conifer branch, it will die back until it reaches a branch with green foliage, or the main trunk.
When pruning conifers, never remove all of the new growth on any branches that need to continue growing. Where possible, shorten and shape green foliage by pinch pruning rather than cutting it.
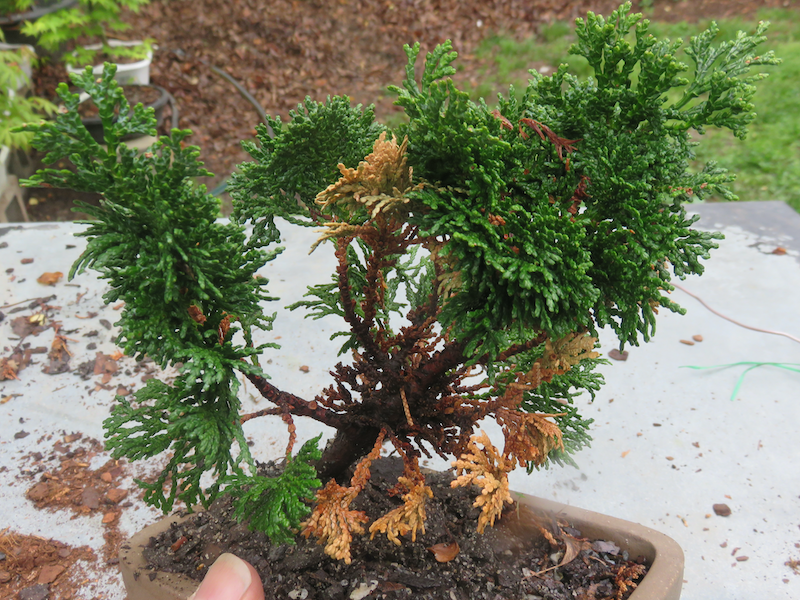
Old dead needles and foliage should be removed regularly as well. Most conifers need full sun to set new buds. Dead foliage blocks light and leaves no space for new buds. On many species the dead needles and scales can be dislodged by rubbing your hands gently over the branches a couple times each growing season.
1. 
2. 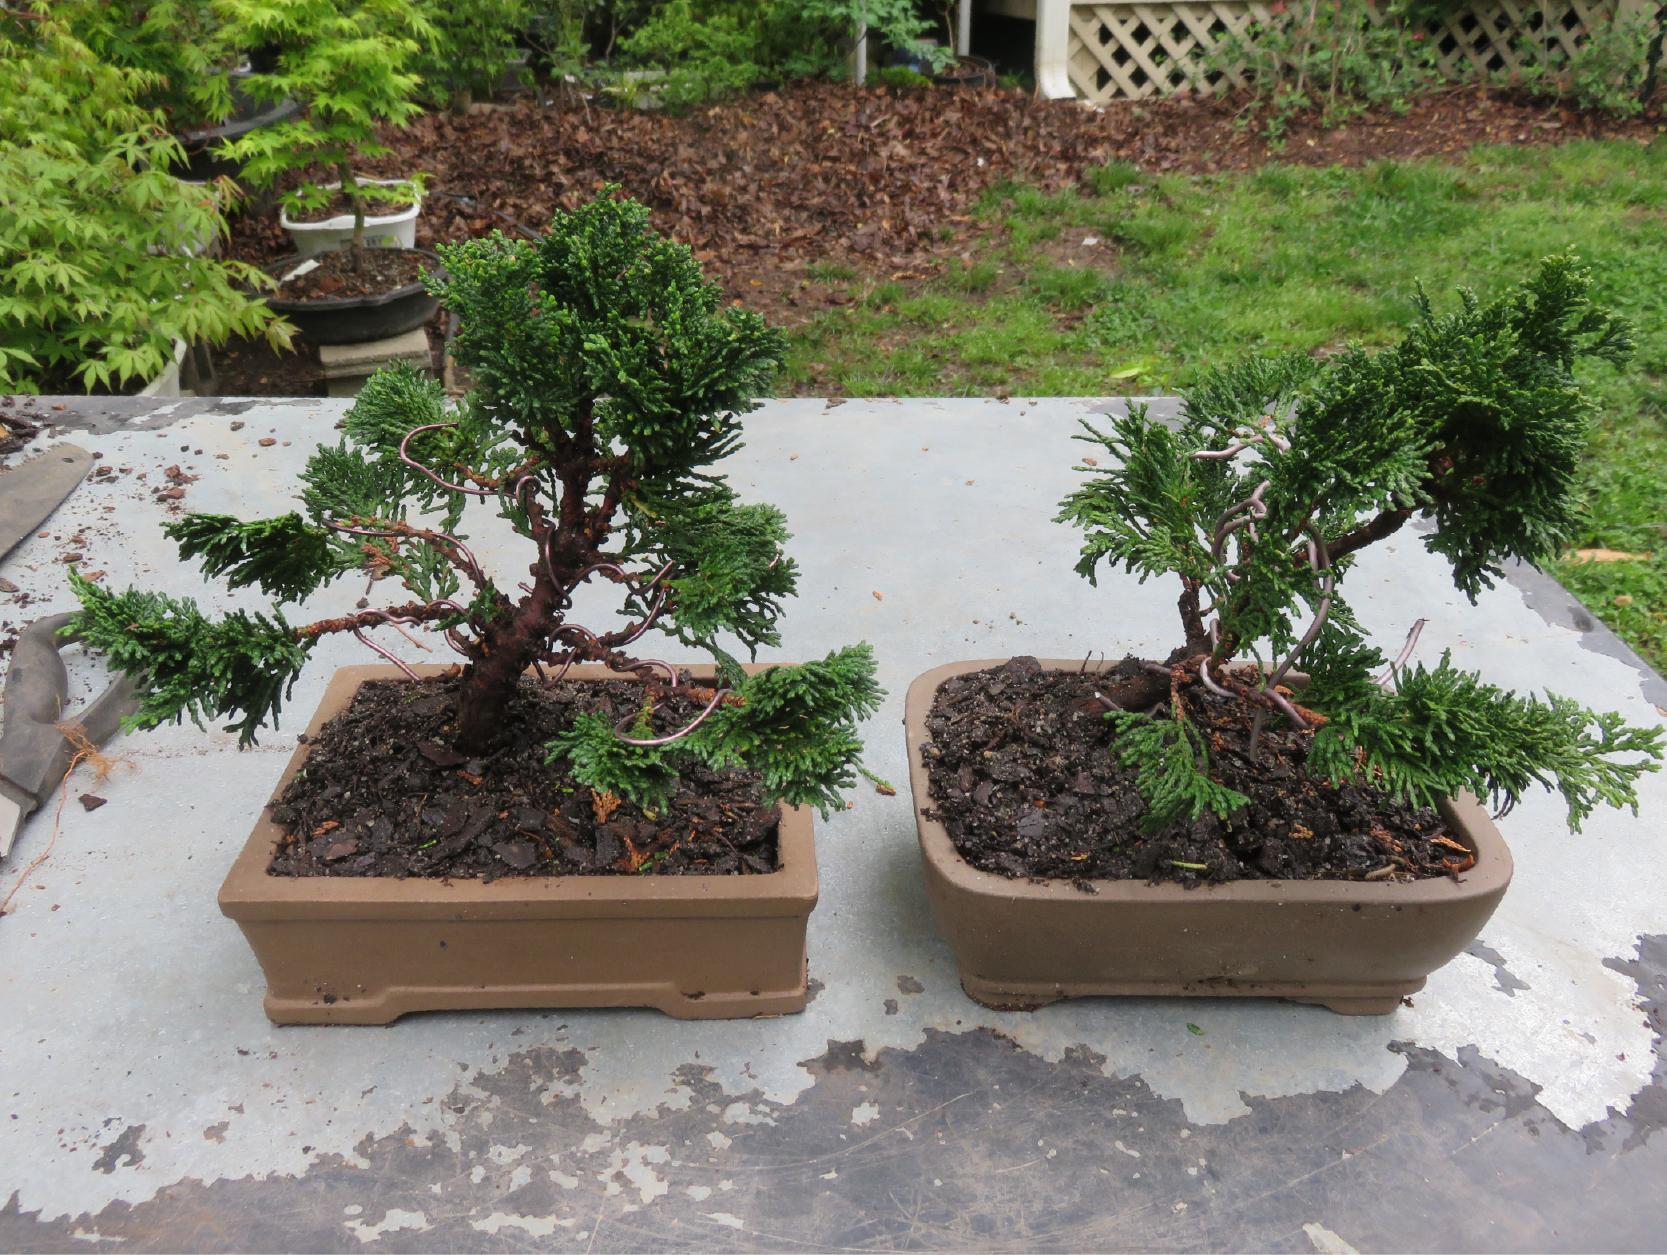
Cleaning out old dead foliage from a hinoki cypress. Image 1. Old foliage will range from pale yellow to orange to gray-white. As long as it is present, it limits how much light can penetrate to the branches and stimulate new buds. Image 2. Two mame hinokis after cleaning and wiring. Original photos by Dan Johnson.
39.6.2 Non-Conifer Evergreens
Examples of this group include: evergreen hollies (Ilex crenata, for example); boxwoods (Buxus sp.); azaleas. Foliage is usually thick and waxy, fleshy, or nearly succulent.
Unlike conifers, some of these species tolerate nearly complete defoliation. Hollies bud back readily on bare wood, so tolerate aggressive pruning. Azaleas also can be defoliated back to old wood and still regrow new foliage.
Boxwoods do not back bud well on bare wood, but only a few leaves are needed to maintain water and nutrient flow in a branch. So they also can be aggressively pruned, leaving just a few leaves. Also their leaves can tolerate being cut through without dying completely. This is why boxwoods are used in topiaries and sheared hedges. The downside is that the cut edges of the leaves turn brown. For bonsai, it is better to pinch out individual leaves and green shoots completely rather than letting them brown.
Use pinch pruning to thin soft green tips of foliage that has recently emerged. Extension growth on non-conifer evergreens can lignify quickly. You likely will need to switch to scissors to remove the hardened extension growth .
39.6.3 Deciduous Trees
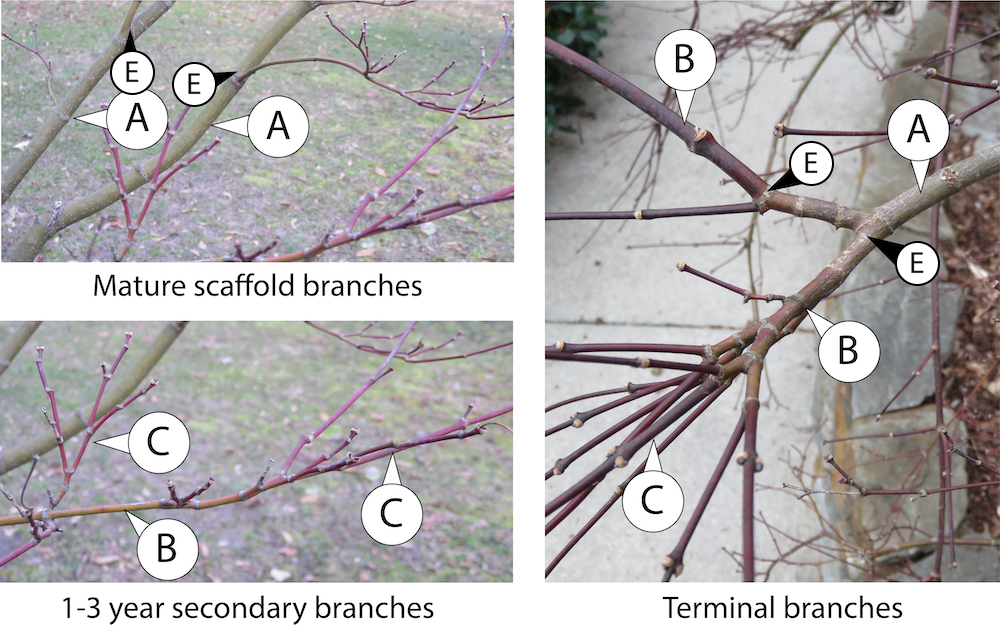
Examples of this group include: trident, Japanese, and native maples; elms; oaks; gingkos. Most pruning will be done on green extension growth. Some tree species like elms and hornbeams will continue growing all summer. Others will go dormant in summer, and have a second growth spurt in fall. Maples, and especially Japanese maples, essentially stop growing when daytime temperatures exceed 85oF, then restart as the weather cools.
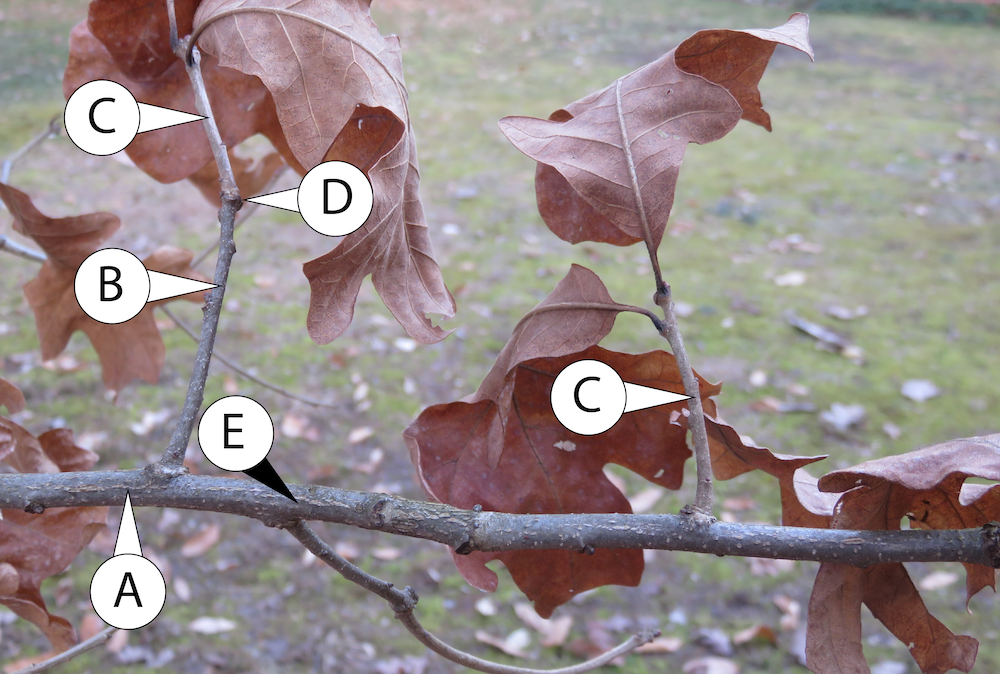
Oaks and gingkos tend to have a single growth flush in spring that slows down or stops by June, and does not restart.
My general habit is to prune the first flush of extension growth as trees come out of winter storage. My goal is to have this round completed by mid-spring (late March to mid-April.) I then try to complete a second round of green pruning by mid June. This is when I finalize the shape of the foliage for the year. Any stray shoots that grow out after that get cut back as they appear. In this area maples will put on another flush of new growth in September as the weather cools, but I tend to leave it in place so it hardens by first frost.
39.6.4 Tropicals
Examples of this group include: bougainvillea; tropical figs (Ficus sp.); snow rose (Serissa foetida); and umbrella tree (Schefflera sp.)
Most tropical species have a similar extension growth pattern as temperate deciduous trees. There are some important differences though.
- Tropicals are functionally evergreen, but not true evergreens. Often they will drop 50% or more of their leaves when moved inside for the winter, while others hold onto foliage for several seasons, dropping a few leaves at a time more or less continuously.
- Tropicals tend to have a semi- or completely dormant season. Like temperate trees, tropicals tend to slow down during our winter months, and grow most quickly in summer. Dormancy ALSO may be triggered by lower humidity or watering, particularly in species that originated in regions with dry and wet seasons.
Tropicals vary quite a bit in how much can be removed. For example, ficus can be completely defoliated and will recover very quickly. Schefflera will back bud on bare old branches, but not reliably. Serissa will not back bud on branches that do not have some pre-existing foliage. Check the individual guides or online for specific recommendations.
A. 
B. 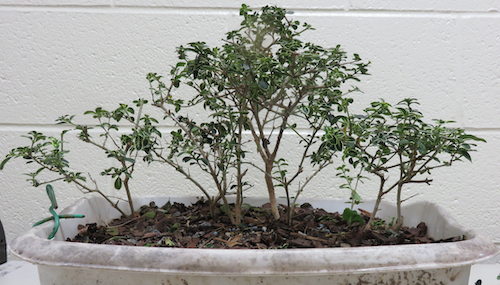
C. 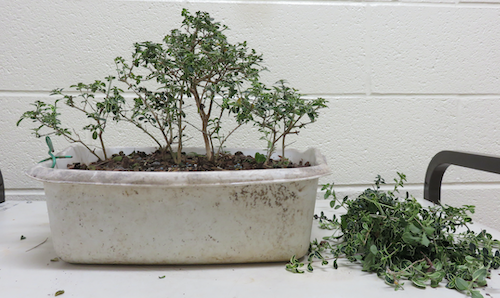
D. 
E. 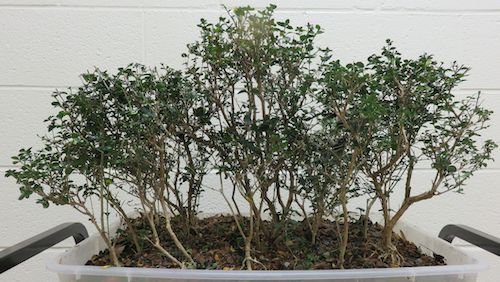
F. 
G.
Rough pruning two serissa groves. I usually prune these back twice a year. The first rough pruning is in mid-winter. They will need a second, more careful pruning in summer to refine their shapes. A-C. A small serissa grove, before (A) and after (B) pruning. C. The amount of pruned materials removed from the small grove. D, E. Front of a large serissa grove, unpruned (D) and pruned (E). F, G. Back of a large serissa grove, unpruned (F) and pruned (G). Despite removing a great deal of growth from both groves, all of the pruning cuts were made high enough on the branches to leave at least 2 leaf-bearing buds. Original images by Dan Johnson.