Chapter 32 Visualizing Styling Changes
I confess that the horticultural side of bonsai is easier for me than its artistic side. One of my biggest personal challenges is deciding which branches to keep or remove. It seems everyone but me can tell which branches should be cut off, and where the movement in the trunk is going to be most attractive.
Fortunately other authors have described many practical non-destructive techniques for visualizing styling changes before actually pruning a tree. These have helped me compensate for my lack of artistic vision.
32.1 Start By Documenting the Trunk & Branch Structure
A treeʼs overall structure is defined by the positions and shapes of roots and branches. For much of the year these can be hard to see. Fortunately deciduous trees drop their leaves each fall, and many tropicals partly or fully defoliate in response to moving indoors. This creates an opportunity to photograph root and branch structure in detail.
After the leaves fall but before storage for winter, clean the leaves from the pots of trees in training. Place each tree on a table in bright shade, in front of a neutral, contrasting background; I use a light gray bed sheet. Try to avoid bright sun, because this throws shadows that can hide important details. You want to use a contrasting background so you can see all of the branches clearly. Take 4-8 photographs of the tree from all sides (a turntable helps). Stand so you shoot the tree head-on (not looking up or down at it), and be sure you can see the entire trunk and all branches. Also take a separate series of photos of just the roots as seen from above looking down. These will help you remember the root structure . Take close-up photos of any other interesting features, getting as close as you can with your camera.
Once you have a full set of photos, store the tree for winter as usual.
32.2 “Editing” a Tree Without Pruning
Photographs taken in fall let you play with different styles and options before ever pruning the first branch. You have the entire winter to plan out what branches to keep, and what to remove.
Start with the photos of the roots. Are they evenly distributed, or asymmetric? Are they long and stretched on one side of the trunk but compressed on the other? Where are the gaps in the root spread? Based on this initial assessment, look at photos, diagrams, or descriptions of the various styles. Which styles are possible options?
32.2.1 Adding and Removing Branches
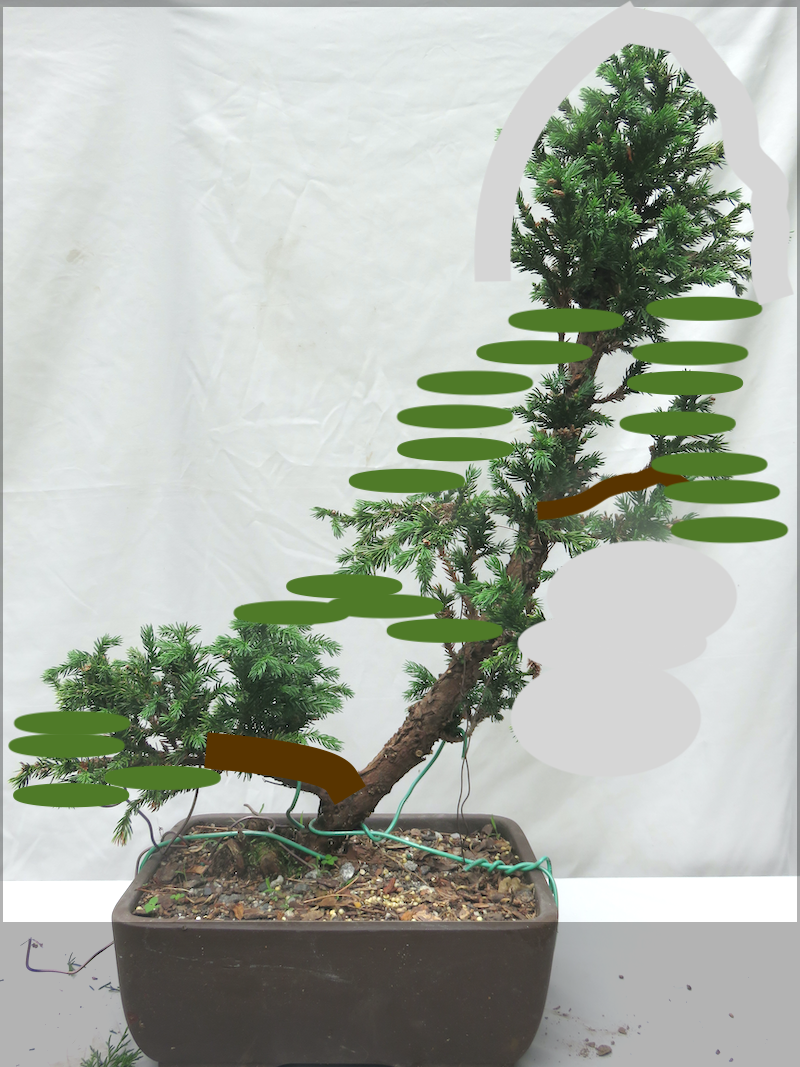
It is more common these days for people to have digital photos than to have prints. This makes it easy to edit the images on a computer, tablet, or even a phone. The revised photos do not need to be perfect. Think rough sketches, not fine rendering.
1. 
2. 
3. 
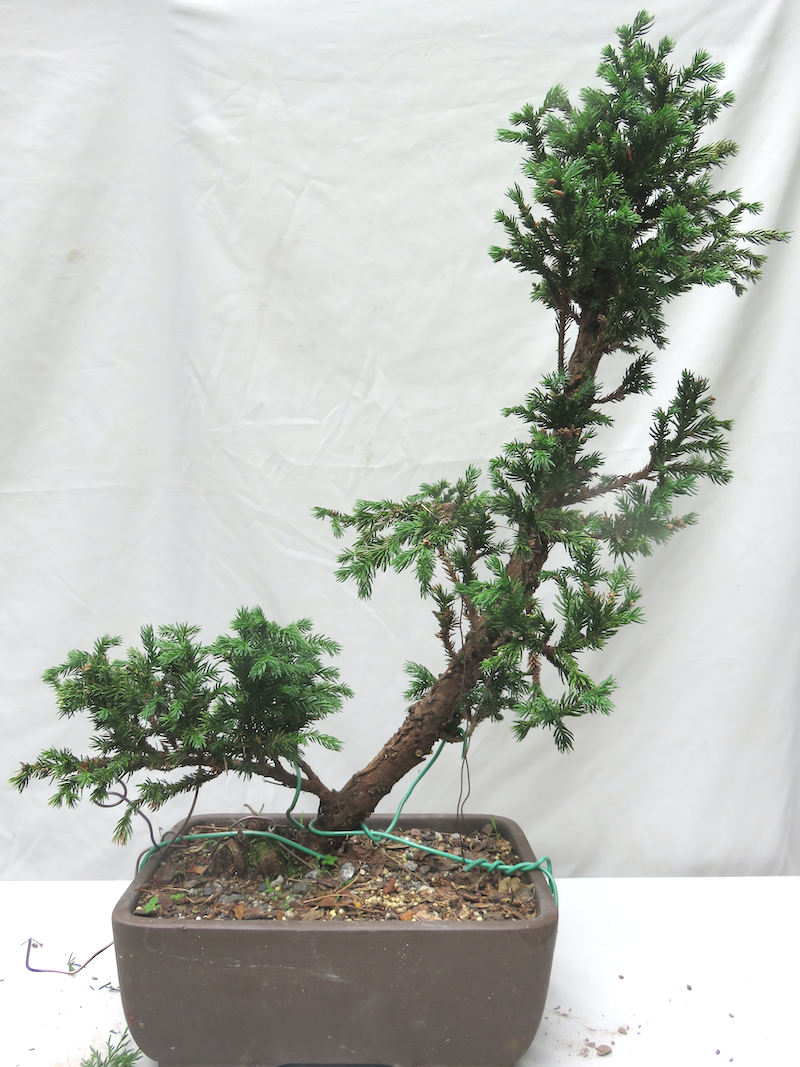
A cryptomeria under evaluation. Due to branch die-back I am thinking about changing the side in view from the back to the front of this tree. If I do, what would need to be done? Image 1. An un-retouched photo of the original front. Image 2. An un-retouched photo of the original back that may become the front. Image 3. The photo after markup. I drew in a thicker bottom branch, added some green ovals to show where I might want new foliage, and drew pale gray lines and ovals to hide some stray branches. I am not happy this this composition, but if I DID like it, I would know what styling elements needed more work. Original photos by Dan Johnson
If you do not have access to a computer, there is a low-tech alternative. Go to an office supply store and use their photocopier to make enlarged copies of the photos of the overall tree; aim for 8x10 inch enlargements. Do not pay for color; black and white enlargements are fine. While there, get a packet of clear 8.5x11-inch acetate sheets, some plain Post-It notes, and 2 dark colored dry-erase markers (one thick and one thin pointed).
At home, pick an enlargement that shows what will probably be the front of the tree. Tape a clear acetate sheet on top of it. This will be your canvas for experimenting with branch placement. If you think a new branch is needed, draw it in. Eliminate branches on the existing photo by covering them with Post-Its. To change or bend branches, cover them with Post-Its, then draw the new shape. If you make a mistake, just erase it and go on. Use photos from other angles to check that what you plan to remove will not leave ugly scars.
Do not rush at this point. Take your time and come back to a tree several times. Check that you still like what you did; if not, erase it. Dry erase marks become permanent if left on the acetate long enough. If this happens, you can moisten a Q-tip with 70% alcohol and use it as an eraser.
Do not worry about foliage right now. If it helps you visualize the final tree, draw it in, but focus on the branch and trunk structure, since these are established first. Fine tuning foliage pads only happens after the trunk and branching are set.
When you are happy with your creation, tape the Post-its down and let the marker ink harden. Or, photocopy the amended drawing. Now you have a record of your decisions to use for initial pruning in the spring.
32.2.2 Double Check Any Modifications Before Pruning
In spring, you can confirm that your on-paper plan will actually work before ever cutting a branch. This time go to a craft or dollar store and purchase some imitation silk or plastic foliage. Do not worry that it perfectly matches your trees; just try to get the kind with wire stems that can be bent to shape. If you will be working with conifers, look for silk foliage with needles rather than leaves, or cheap Christmas garland.
Also pick up a white, pale cream, or pale gray twin bedsheet or fabric scrap. You will use this to drape branches and block them from view.
Wait until after the first buds have opened, so that you do not knock them off. Following your photo plan, gently hide branches you plan to remove behind sheets of white paper, or wrap them loosely in fabric.
To imitate new branches you want to develop, put small pieces of the silk foliage in the approximate location you drew the new branches or foliage pads; the wire in the faux foliage will help you bend it into place. If you plan to bend an existing branch or create a new apex, hide the original branch with paper or cloth, then add back the branch in the position you planned to bend it using silk foliage.
4. 
5. 
6. 
Visually editing a tree before pruning. Image 4. Using a pastel bed sheet to hide branches and find the scaffold. Plain paper works well too. Image 5. Filling in foliage temporarily in a Japanese maple grove with craft store silk foliage (panels 2,3) or with a pruned branch from a similar tree. Image 6. Filling in foliage on a cryptomeria using pruning cuttings from a red cedar tree. Original photos by Dan Johnson.
If your original plan works, you should be fairly satisfied with the arrangement of branches that you can see on the tree now. However, you are just as likely to find something that does NOT work well in your original plan. That is okay too; look at other arrangements or modifications. It may only require a minor change to balance the composition and make it conform to your original vision. If so, you can start pruning confidently.
If you are not happy after some fine-tuning, consider waiting until you have time to look at the composition more carefully. It may be that the tree is not going to fit the style you picked out, or the branches are not placed as well as you originally thought.
32.3 Some Final Thoughts
The process I have described may seem tedious. However, I feel it is a reasonable way to work until you develop your own work style and preferences. As your artistic perspective improves, you will likely abandon this method entirely.
Horticultural needs of bonsai trees revolve around the growing season. Root pruning, feeding, and other work need to be done on a specific schedule. The creative side does not have to be so rigid though. Do not be afraid to back up and change your mind, or wait until you see clearly what you want. That is part of the art. If your tree is telling you, “that is not what I should be,” then listen. You are less likely to regret your decisions.