Chapter 65 Using Micro-Irrigation
Micro-irrigation (aka drip, trickle, or low-pressure irrigation) refers to any watering system designed to apply water directly to plants, as close to the root zone as possible. If you have ever used a porous soaker hose to water bedding plants, you have some experience with micro-irrigation. However, that porous black soaker hose is about as different from current micro-irrigation equipment as a 1910 Ford Model T is from a 2020 Expedition SUV. Even very basic entry-level micro-irrigation systems let you precisely control the total amount of water applied each day, and minimize wasted water.
65.1 How Did Micro-Irrigation Get Started?
Several concurrent events led to what is available to us today. The first event was the need to improve landscape and agricultural irrigation practices. In traditional overhead irrigation, only about 20% of water applied is available to the plant roots; the other 80% is lost through runoff or by evaporation from the leaves and soil. Rising irrigation costs spurred research into alternative methods that use water more efficiently.
Around the same time the nursery industry began switching from balled and burlapped production to containerized stock. This created the need for better ways to water that stock reliably. Farmers looking for an alternative to tobacco and other annual cash crops also began experimenting with vineyards, berry fields, and other perennial crops that are more sensitive to irregular watering. These trends further accelerated development of micro-irrigation equipment.
Micro-irrigation proved to be more economical than traditional irrigation. Retail price for the brass and iron hardware for a single traditional overhead irrigation tower assembly is about $80, plus initial setup costs to have a plumber install specialized plumbing. Each tower can irrigate a 50-foot diameter circle (1965 sq.ft.), but the ability to regulate where water goes is limited. In comparison, an entry-level micro-irrigation starter package that hooks up to an outdoor faucet costs about $60. It can reliably water up to 25 trees spread over an area of 12x20 feet (240 sq.ft.), using 20% of the water of the overhead sprinkler tower. Individual water emitters can be shut off as desired, allowing finer control. Micro-irrigation is even more efficient when used with regularly spaced plants such as those in a nursery or vineyard. Little wonder that most of the vineyards in the Yadkin Valley install micro-irrigation lines as part of their trellises.
65.2 Getting Started
Residential micro-irrigation systems can be assembled from individual parts, but I recommend buying a starter kit. This eliminates worry over whether you have everything. Most starter kits contain 100-200 feet of water line, various adapters for connecting the water line together, all of the necessary adapters, fittings, and filters, plus several different kinds of emitters. The advantage of this approach is that you can experiment with different kinds of emitters (water outlet valves), then buy what you really like in bulk later. Expect to spend about 30-45 minutes putting together the main water line. How long it takes to install the water emitters will depend on how many trees you have and their arrangement.

Half-inch water line with quarter-inch delivery lines of a low-pressure irrigation system. Link to original image.
Most brands use the same basic components. This is handy because you can mix and match parts. I have combined parts of one brand I bought online with parts of other brands I bought from Home Depot and Lowes Home Improvement, and never had any problems.
The main water line will be 1/2-inch thin walled black plastic tube that you will connect to your water source. Depending on the water pressure source, a pressure regulator valve may be needed. Next comes a water filter, which traps particles and debris that could damage the emitters downstream.
After connecting the 1/2-inch main line to the adapter and water supply, the line is laid between the rows of plants or trees to be watered. The main water line will stay in place all season, so I recommend staking it down with landscape fabric staples. It can also be buried under mulch. When laying it out your goal is to place the line within 2 feet of anything you want to water. The water line does not need to be a single continuous piece; right angle, T-, and X-shaped adapters are available that let you branch the main line or connect additional lengths of tubing.
The water line must be flushed of air and pressurized to work correctly. To do this, the water is turned on to maximum flow (the regulator will take care of the water pressure for you). As the line fills, air gets pushed out, which you will hear escaping from the open end. At some point, water will begin flowing from the end, then it will belch air and water for several seconds. Once the water flows smoothly from the end of one water line, it has been flushed and is ready to close.
Closing off the 1/2-inch water line is ridiculously easy; just bend it in half, about 4 inches back from the open end. There are special fittings for holding the tubing closed, but they are mainly for convenience. Stiff wire twisted in a figure 8 works just as well. Like a kinked garden hose, the bend closes the tubing, and since the pressure is lower than a regular hose, water does not leak out.
65.3 Delivering Water to Your Trees
Now it is time to install emitters. Suppliers sell hundreds of different emitters that vary in:
- How much water they deliver (in gal/hr)
- How large an area they deliver over (the range spans from 2” circle from drip emitters to spinners that cover a 15’-diameter area)
- The spray pattern (full circle, half circle, wedge, slot), and form (fog, mist, droplets, sheet flow)
- End fitting (barbed/friction or threaded inlet)
- Support (stake required, included or not)
To install an emitter, a small hole is punched in the main line with a hand tool (comes in the kit.) A drip emitter can be inserted directly into the main water line. Alternatively, a 1/4-inch diameter barb connector is inserted and the other end is connected to a 2 to 4-foot length of 1/4-inch flexible tubing, which is then connected to the inlet on micro-sprayer or other emitter. The end unit can be placed anywhere in the radius that the tubing will reach. Do not panic if you find a particular emitter is not doing the job you hoped or is damaged; simply twist it out of the line, and install a different one.
A drip emitter connected directly to the main water line. Link to original image.
65.4 How Many Emitters Can I Use at Once? What Kind Should I Use?
This is the hard part. You must spend some time planning and observing your setup to determine what will work best for your trees and location. Here are questions you need to ask.
65.4.1 What are your water limits?
A standard exterior home spigot on city water provides about 3.5 gallons a minute, or 200 gallons an hour. So in theory you can move 200 gallons of water through your system each hour. If you are using emitters rated for 1 gallon per hour you should be able to use 200 emitters. If you use emitters rated at 4 gallons per hour, the most you can use would be 50 emitters. However, I suggest not pushing to this limit, at least until you get familiar with how your setup behaves, and you are sure it waters consistently. Also, late in the day I have found my system started dropping pressure, and delivered less than 150 gallons an hour.
65.4.2 What type of emitters do you need? How many?
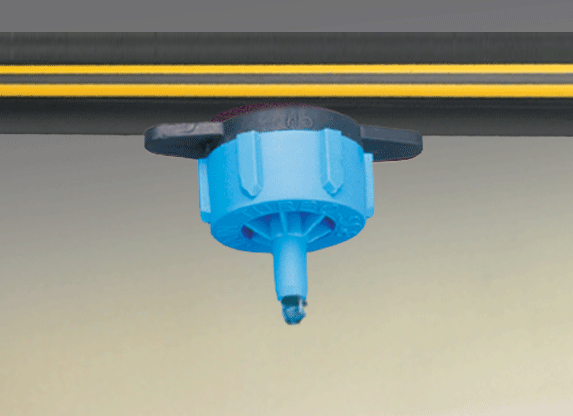
For trees in training pots and boxes, I would suggest the type of emitter called (depending on the maker) a microsprayer, minisprinkler, or minitower. These emitters create a 360o umbrella of water, and are designed to be mounted on a short support stake. The stake can be inserted directly in the pot next to the tree, so it waters the entire box or pot. If you have a choice, get emitters with adjustable flow, so you can fine-tune the amount of water delivered.

Low pressure mini-sprinkler. Link to original image.
A second choice is drip emitters. These are NOT suitable for trees in small pots, but they work very well for trees in larger pots and trays (20 gallons or more). They are the best choice for trees planted in the ground. A drip emitter is exactly what it sounds like; a large plastic “button” designed to release a given amount of water from its open end (the usual range is 0.5-2 gallons) every hour. A drip emitter does not spray water, but rather relies on capillary action to draw the water away from the point of soil contact and saturate the entire root zone. Drippers can lay directly on the ground, or be attached to a stake.

A fixed flow drip emitter. Link to original image.
Drip emitters were designed originally for watering crops in open ground, but commercial nurseries found they could grow large trees above-ground in pots or fabric bags using 2-4 drip emitters to provide all necessary irrigation.
There are other types of emitters available, and even specialized drip tapes and in-line emitters designed for automatically watering large areas for long periods. I have tried them, and I would not recommend them for targeted irrigation.
How many emitters you need depends on how much water your trees require. To start, plan on 1 emitter for every 1 or 2 trees. The goal is to match the flow rate of the emitters to the amount of water your trees need, so that you turn on the entire system once, then turn it off after a specific time. In that time, each tree should the amount of water it needs (or perhaps a bit more), but never less. To do this you need to know how much water each tree needs routinely. Try watering a tree as usual, and count how many seconds you water. Then put water into a bucket for the same amount of time, and measure that. From that you know about what flow rate of emitter you need to place in the line that pot or box.
65.5 How long do you need to have the water on?
The simplest thing to control is how long your system is on. It is easier (and cheaper) to adjust emitter flow rates and numbers so that all of your trees get the appropriate amount of water after the same amount of time than it is to install valves and controllers that turn parts of the system on and off. So once again you must plan ahead.
Set up your micro-irrigation system a couple weeks ahead of when you will actually need it. Then use it rather than water yourself, and monitor how it is working. Turn it on for an hour, and ignore it. Don’t panic if every last morsel of soil is not wet right after you turn it off; wait about 30 minutes to see if the water redistributes by itself in the pots. If the current emitter positions leave dry spots, try re-positioning them a bit. If MOST of the trees do not appear to have enough water, turn on the system again for another half hour. Keep adjusting time and emitter locations until you are satisfied with the coverage. For trees in pots with appropriately formulated soil, it is probably better to over- rather than under-water, but try to adjust watering so your trees are getting just enough or a little bit of excess.
65.6 Who is turning the water on and off for you?
Will someone turn the water on and off, or do you need to purchase a hose-end timer? While hose timers are pretty reliable, I am too paranoid to trust one that I have not tested for several days before leaving.
65.7 For Supplies and More Information
Micro-irrigation has proven itself in the nursery, greenhouse, and landscaping industries, but is still not widely used by homeowners, largely because it requires some monitoring and attention; it definitely is not a “set it and forget it” system. For bonsai enthusiasts though, the effort required is not a burden, especially given the peace of mind it can provide during the heat of summer.
Two companies are the primary suppliers. Rainbird (www.rainbird.com) is the most common name you will see in retail stores. The Drip Store (www.dripirrigation.com) is the leading online vendor. In addition to their catalogs, both companies offer extensive online resources. They also have a particularly useful online tutorial at www.dripirrigation.com/drip_irrigation_tutorial.
If you are interested in trying out micro-irrigation yourself, consider starting with a basic kit first. To learn more check online guides to xeriscaping. Many sites have information on drip irrigation.