Chapter 30 Starting a New Tree
Every stylist develops their own approach to starting a new tree? This is how I work through the process. I am looking at regular nursery stock tree like you would find in a retail garden center. I probably skip some of these steps when shopping at a specialty nursery since the growers there likely have done some pre-screening already.
30.1 Look For Good Foundation Elements
One of the most important steps in developing a bonsai is creating the nebari or root flare that large trees develop to anchor them in the ground.
1.  2.
2.  3. !
3. !
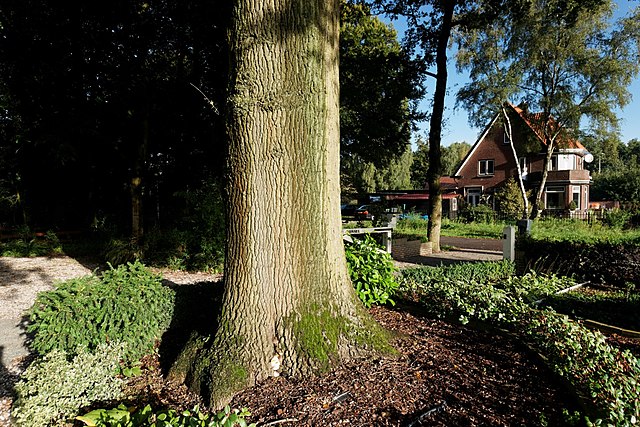
Image 1. Natural nebari (root flare) on an oak. The nebari creates a sense of age and stability. Image 2. Despite being more than 200 years old, this oak does not have as extensive nebari compared to the previous tree. Image 3. A mature tree without nebari. Despite its size, the straight trunk makes the tree appear quite young. Incidentally, Tree #3 has a root that is crossing over the main trunk. As the tree grows, this crossing root will choke the cambium and weaken the tree. Link to original image 1; image 2; image 3.
30.2 Evaluating New Nursery Stock
So what am I looking for? I went to a local nursery center in late January, and took photos as I looked at some potential stock trees I might style. All of the trees on the tables were leftovers from the fall planting season; new spring stock had yet to arrive.
I always start by looking at the base of the trunk at the soil line. Does the trunk flare out nicely so it is 2-3 times larger than the main trunk? Are there roots radiating out evenly around the base?
1A. 
1B. 
OPTION 1. View A. Here is a holly that caught my eye initially because it has so many branches near its base. View 1B. This is what the basal regions looks like up close. I dug down an inch below the soil line, and the straight trunk continues down without any larger roots. There also is a slight but noticeable reverse taper; the trunk is larger where the lowest branches emerge than where the trunk enters the soil. Original photos by Dan Johnson.
Lack of nebari and well-spaced roots is not an automatic disqualification, but building up basal flare takes 2-7 years depending on growth conditions. Most experienced stylists will pass over a tree that does not already have attractive nebari unless the tree is an unusual cultivar or has some other unique features. The reverse taper sealed my decision. I decided to pass on this holly.
Next I found three boxwoods worth considering. All three are the same size (4-5 feet high) and age class. I’ll show you photos of each one; see which one (if any) you think I took home.

Three boxwood candidates for bonsai. From left to right, I will refer to them as Options 2, 3, and 4. Original photo by Dan Johnson.
OPTION 2
!
Option 2 (left tree), on its own. Original photo by Dan Johnson.

Close-up of the front base of Option 2. Original photo by Dan Johnson.

Close-up of the back base of Option 2. Original photo by Dan Johnson.
OPTION 3

Option 3 (the tree in the middle), on its own. Original photo by Dan Johnson.

Close-up of the front base of Option 3. Original photo by Dan Johnson.

Close-up of the back base of Option 3. Original photo by Dan Johnson.
OPTION 4

Option 4 (the tree on the right), on its own. Original photo by Dan Johnson.

Close-up of the front base of Option 4. Original photo by Dan Johnson.

Close-up of the back base of Option 4. Original photo by Dan Johnson.
From the photos it is probably obvious that I chose Option 4 as the starter tree to take home. Both of the twin trunks have reasonable flair when viewed from the front, and taper smoothly. There are some large roots that will need to be shortened, but they are on what I think will be the back side, so the scars will not be as visible.
I did not choose Option 4 based on nebari alone though. I looked at several other features before I chose it, which I will describe shortly. First, why did I skip the other two?
Option 3 was the easier one to eliminate. One of its two main trunks has almost no basal flare, is split well above the soil line, and does not have spreading roots. So I would need to cut off one of the two trunks, which would remove half of the useful branches.
Option 2 looked more interesting at first, but there is an awkward crossing root on the front, and when viewed from the back side the fusion of roots is not equally prominent on both trunks. One trunk might have to be removed to create a broader base. Still, if Option 4 had not been such a good choice, I might have bought this one.
30.3 Subsequent Evaluation
Once I see a tree has good basal flare, I put it on a bench by itself, step back, and try to see what that tree could be pruned down to reveal.
Branch placement: the next important element in a bonsai. Are there many smaller branches coming out on all sides to choose from, or just a few branches? Fewer branches are fine if they are well positioned, but having many smaller branches gives me more choices of what to keep vs. remove. One of the advantages of a boxwood is it will back bud on older wood, adding more branches in the future if needed.
Option 1 (the Steed’s holly I showed earlier in this story) is an example of a starter tree that has many branches from which to choose, which is what drew my attention to it initially. Unfortunately good branches cannot compensate for a poor trunk line.
Health: it does not matter how beautiful the structure is if the tree is unhealthy. I push the trunk back and forth in the pot. Does the tree feel well anchored? If it moves easily, the root ball may be small, weak, or partly rotted. When the sales clerk is not looking, I try sliding the pot down a few inches. Does the root ball and soil come out in a block (meaning it may be root-bound) or does some looser soil remain around the mass? Do I see healthy light-colored roots? Does the root ball smell foul or rotten?

Option 4 is slightly pot-bound, and the soil has begun breaking down. Also, the soil looks dry. This tree will need some additional soil and a thorough soaking to survive the winter, but is not in bad shape for end-of-season stock. Original photo by Dan Johnson.
Foliage: some burned or damaged leaves is nothing serious, but are whole branches dead with no obvious cause? Do any dead areas extend down the trunk to the soil line? Dead zones extending below the soil are a hard “no” for me, because these trees almost always die in my hands.
1.  2.
2.  3.
3. 
Images 1, 2. Foliage on the Option 4 boxwood from two sides. Image 3. Close-up view of the foliage. This boxwood has bronzed leaves, which are a sign of winter burn (blue arrows), and some corky scars from insects or wind damage (orange arrows). Yet there are signs of new buds and good green color on the inside branches (purple arrows), suggesting the tree is still healthy. The main scaffold branches are all sound as well. Original photo by Dan Johnson.
If the tree passes these tests, I put it on a bench, step back, and ask myself: will I enjoy working on this piece for several years? Or, is it likely to be more frustration than fun?
My final test is to look at the price tag. Am I willing to throw that much cash into the trash? It might seem harsh, but I have to think about a new tree like any other leisure activity. Am I willing to spend that money just for the learning experience and pleasure of working on that tree? Even if I have nothing to show for it at the end?
1.  2.
2.  3.
3. 
The price tag test. Image 1. The price tag on Option 1, the Steed’s holly I rejected earlier. Given how much work that holly needed, and the high chance of it dying as I tried to wrangle the roots, the price was too high. Image 2. The price tag on the Option 4 boxwood. Even though it was more expensive, the boxwood is the better buy because I will not have to work on developing the nebari. I can start on root and top pruning right away. Image 3. When you buy a new tree, make a habit of photographing any hang tags or labels so you have information like light requirements, normal shape, cultivar and species, etc. Original photo by Dan Johnson.
Remember this is a living tree. It is entirely possible that it will not work out like I think, or it will die despite my best efforts. More than once I have not bought a tree because I could not commit to throwing out the money. I think this is a good gut check for me because more than once I did NOT apply my “cash in trash” test and regretted it later. I’m sure most stylists have their own gut check question, even if they don’t think about it consciously.
30.4 I Don’t Rush Initial Training
What I do when I get a new tree home depends on the time of year. If I buy a tree in spring, I often repot it immediately. However I also buy a lot of discounted leftover trees at the end of the planting seasons (mid-June through July, and November to January.) They usually cost just a few dollars, and they are great practice for more expensive stock.
The trade-off with buying discount stock is that it is the wrong time of year to start training. Moreover, end-of-season trees often are root-bound or have a lot of soil missing. Rather than hold them in their current container I usually overpot them.
I slip the tree from its pot and move the entire root ball with minimal disturbance into a slightly larger nursery pot to give the roots more breathing room until I am ready to start formal training. If the root ball is so tight that water is not soaking in, I use a root hook to loosen the sides and bottom of the root mass, then soak it for an hour in a bucket of water to rehydrate any dry spots.
When overpotting I use either a mix of 50% pine bark/50% black topsoil, or some of my standard mix that has been recycled from trees I repotted earlier. When I “officially” repot the following spring, most of the bark/soil mix will fall away and can be recycled again for potting up seedlings or to overpot other trees.
30.5 Where To Go From Here
This is one of the “journal trees” for which I created a separate page to document its progress from initial repotting to tree in training. Check out the rest of this tree’s story here.