Chapter 22 Identifying Trees You Do Not Know
In his presentations, Arthur Joura from the NC Arboretum advocates using local species to create bonsai, for three reasons.
- Local natives are well adapted to our climate.
- Trying new species opens up bonsai to expansion and reinterpretation in a unique local style.
- If our goal is to capture the essence of a local natural scene in miniature, why not use the species we see around us in North Carolina?
To adapt a local species for bonsai we need to know what light, water, and soil conditions it prefers. Look at where the tree grows frequently in the wild. Is it found mainly along streams? If so, it likely prefers sandy soil, partial sun, and ample water. In contrast, a tree found on hilly ridgelines probably prefers full sun, rocky soil, and less water.
Still more useful information can be found in a general field guide to the trees of eastern North America or online. But how do you look for information on a tree if you do not know what species it is?
It is not necessary to send a specimen to a professional botanist for identification. Most common trees and shrubs that grow here can be identified in the field at least to the genus, and usually to the species, with just a hand lens, a notepad or scrap paper, your five senses, and an inexpensive field guide.
22.1 Tools of the Trade
When you find a specimen you want to identify, write down as much information as you can about the main features I describe below. Make a sketch or trace around 2–3 leaves, including the arrangement of the leaf veins. Note whether it is in shade or sun, wet or dry soil, and any tree species growing nearby that you DO recognize. You will use all this information to key out the tree using the field guide.
You probably need a hand lens, but do not go overboard. I use a folding hand lens in a metal case only because I had it already. A pocket magnifier from Office Depot or Loweʼs works fine.
Every field biologist has particular guides they prefer to use, some of which are extremely detailed. The most user–friendly book I know is Petersonʼs Field Guide to Trees and Shrubs, which describes trees, shrubs, and vines for the entire eastern US and Canada. It has a primer on field characteristics used to identify woody plants. The keys are intuitive, and the drawings are clearly laid out and well labeled. Used copies are available from Amazon for less than a dollar.
22.2 What Features Are Most Important?
Most trees and shrubs can be placed into one of five major groups based on three main features:
Types of Leaves. Are the leaves needles, as on pines, or flattened and broad, as on oaks and maples?


Needle-like leaves (1) versus flat deciduous leaves (2). Link to original image 1; link to original image 2
Arrangement of leaves. Do two leaves come out directly across from one another on a twig (opposite leaves, as on ash, maple, viburnum, dogwood), or are they staggered along the twigs (alternate leaves, as in hickory, oak, birch, cherry)? Do 3–5 leaves come out simultaneously in a ring or fan around the twig (whorled leaves, as in chaste trees, some buckeyes)?


Comparison of opposite leaves (1) versus alternate leaves (2). Link to original image 1; link to original image 2.
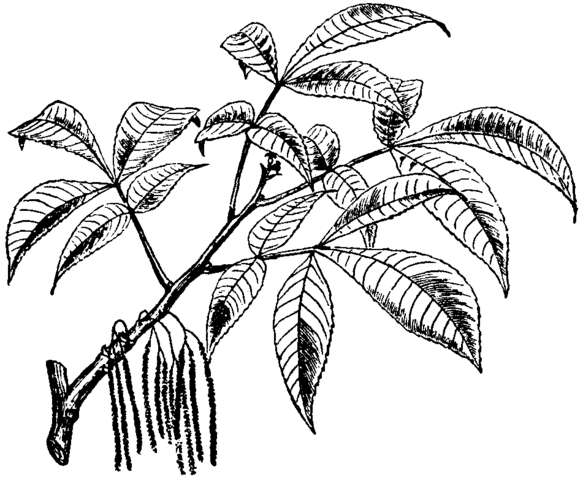
Simple Versus Compound Leaves. This one is more difficult. Most trees (oaks, maples, etc.) have simple leaves that come off twigs individually. Other trees have a compound leaf, where several smaller leaflets come off a central stem. There are two ways to spot a compound leaf. First, the central stem of a compound leaf may be stiff, but it never has woody bark. Second, look at the base of each leaf. Simple leaves have small buds at the base of every leaf. A compound leaf only has buds at the base of the central stem; there are no buds at the bases of the individual leaflets. A good example is a hickory, which has 5-7 leaflets per compound leaf.


.jpg)
Comparison of simple leaves (1) versus compound leaves (2, 3). Link to original image 1; link to original image 2; link to original image 3
Using these three main features, a tree or shrub can be classified as having:
- Needle– or scale–like leaves
- Opposite, simple leaves
- Opposite, compound leaves
- Alternate, simple leaves (the biggest group)
- Alternate, compound leaves
These five major groups are subdivided further based on secondary features.
22.3 Secondary Leaf Morphology
Most field guides use this same set of secondary features to further distinguish different species. Try to record as many of these features as you can.
Lifespan of Leaves. Are leaves seasonal and deciduous (like oaks), or thick, long–lived and evergreen (like hollies)?
Number of Needles or Leaflets. How many needles are in each bunch or bundle that comes off of conifer twigs? If a tree has compound leaves, how many leaflets per leaf?
Leaf Vein Patterns. Do several veins spread out from the leaf stem (palmate veins, as in maples), or does one vein run the length of the leaf, with smaller veins radiating from it like a feather (pinnate veins, as in oaks, magnolias)?

Secondary leaf morphology features used to identify trees. Modified from original; link to original source.
22.4 Other Useful Features
Leaf Shape and Texture. Is each leaf smoothly rounded (ficus), or lobed (oak or poplar)? Are the edges smooth (dogwood), or toothed (beech or elm)? Are the leaf faces smooth (most leaves), or rough (hickory or hackberry)?
Stem, Bark Features. Are stems or twigs solid or hollow? What is the color, texture of bark on twigs, and the main trunk? Does it have one trunk or several? Are there thorns? Is the bark ridged, ringed, warty, or marked?
Buds, Flowers and Fruit. The structure and position of dormant buds, flowers, & fruits are gold standards for identifying trees and shrubs, but are only available seasonally, and some traits are hard to see.
Giveaway Features. Some trees have a trait that cannot be mistaken. For example, nearly everyone recognizes the scaly cup and nut of an acorn, which is a feature unique to oaks. Other species have a characteristic structure (the spiny seed balls of sycamores), taste to the leaves (sourwood and cherries), or odor when bruised or wet (hickories). Field botanists learn these traits with experience; many are listed in field guides, and are good for confirming an identification.
22.5 Keying Out a Tree
More technical field guides arrange features into a written flow chart, called a dichotomous key. The first pair in such a key might read like this:
- Leaves deciduous……………..Go to #2.
- Leaves evergreen………………Go to #8.
Suppose I have an unknown specimen with thick leaves that are probably evergreen. In the example above, I would skip over Steps #2–#7, and read the choices for Step #8. Later steps will likely ask about leaf shape, size and vein patterns. As I go through later steps using the field notes I took, the key eliminates species in a logical sequence, until just the correct species remains.
Two people can interpret the same features differently. So do not worry if you do not get the correct identification immediately. Go back one step in the key, and try to follow the other branch. Do not be afraid to try to match your unknown to drawings or photos in the field guide either.
22.6 Preserving Specimens
If a treeʼs identity still eludes you, preserve samples from it for future reference; you may find someone else knows the tree already. Lay several leaves (preferably still attached to twigs) flat between sheets of newspaper, and weigh them down with a heavy book to dry. Pressed leaves and twigs retain nearly all the features needed to make an identification, and can be stored in manila envelopes. Flowers and fruits can be preserved in a glass jar of 50% ethanol (mix two parts 70% rubbing alcohol with 1 part tap water). Note the date and location where you collected the materials. Try to get a photo of the tree that shows its normal habitat, the arrangement of the major stems or trunks, and any flowers or fruit.